Sunday 27 May 2012

Another sunny day

It has been beautiful weather in Somerset today, and very very hot! So I decided to find a something to do and it turns out there are some lovely gardens just up the road from me. My purse was also happy as it turns out that today only you could get in free. It is a lovely garden called Kilver Court and Gardens and it is a great way to spend a few hours.


Wednesday 23 May 2012

Bagels

Week 22, Bake 22.
I've decided that I really like kneading. It's not even about getting out the aggression, I just like it (its almost like playing with play dough). Anyway, I am now struggling for ideas for my bakes, I have some in my head but they are being saved for special occasions or times when I can't think of any better bakes. It has been a lovely sunny couple of days in Somerset, which was made even better that yesterday at work I got to go on a school trip to see the Olympic Torch with the children. It was actually quite great and of course I took pictures...

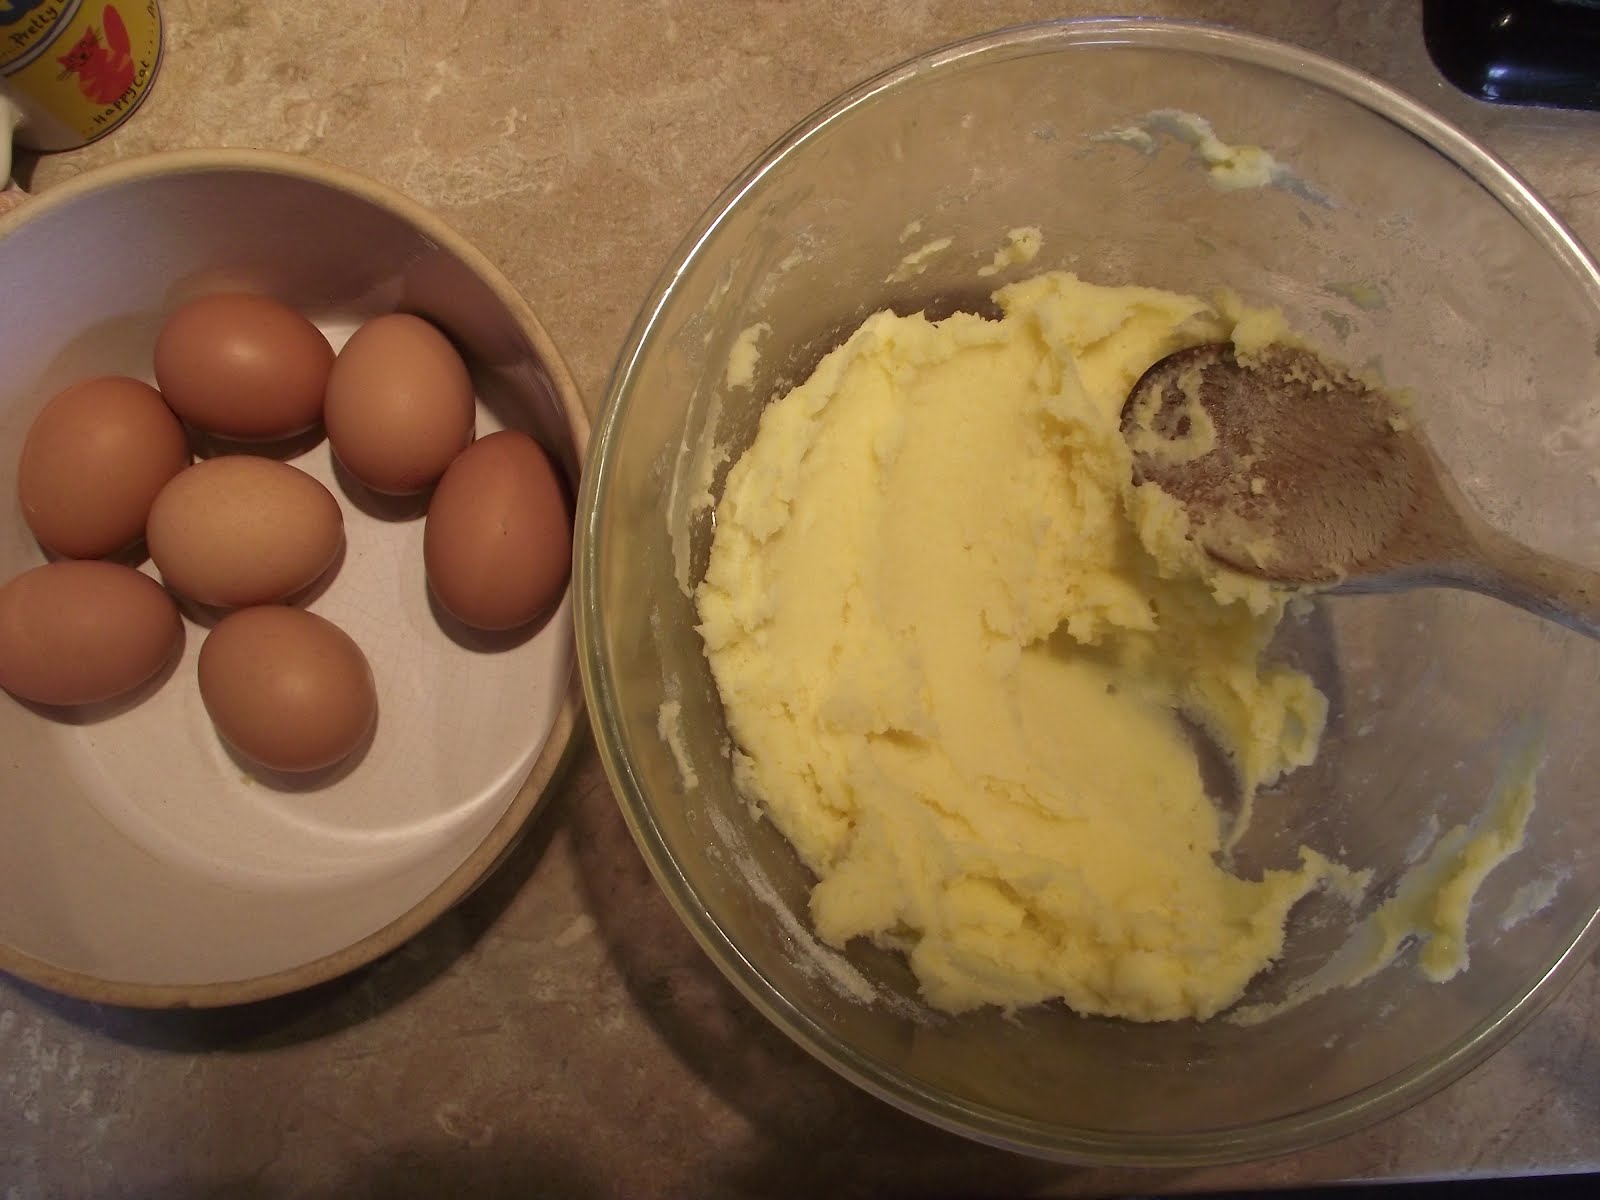
Anyway so this weeks bake is bagels as I thought I would try something different.

Ingredients:
  • 1x 7g sachet of dried fast action yeast
  • 4 tablespoons of caster sugar
  • 2 tsp of salt
  • 500g of bread flour
  • Sesame seeds to decorate
  • water
Method:
  1. Tip the yeast and one tablespoon of sugar into 100ml of warm water.
  2. Mix with a fork and leave for 10 minutes to get frothy.
  3. Pour it into a large mixing bowl and add 200ml of water and the salt.
  4. Now stir the flour in a little at a time using a wooden spoon. Bring it into a ball of dough and turn it out onto a floured surface and knead it for 10 minutes (or until it becomes elasticated).
  5. Cover the dough in an oiled bowl and leave it to rise for 1 hour (or until it has doubled in size) in a warm place.
  6. Pre-heat the oven to 200c.
  7. Turn out the dough onto a lightly floured surface and divide it into 10 balls of 85grams.
  8. Shape it into a flattish ball then using a wooden spoon or your finger create a hole in the centre and twirl it around until you have a 3cm hole.
  9. Shape your bagel to make sure it is the perfect shape.
  10. Cover the bagels with cling-film whilst you shape them all.
  11. Now boil a saucepan of water and the remaining sugar.
  12. Slip the bagels (one at a time) into the boiling water and flip them over cooking them for a minute.
  13. Remove the bagel from the pan, then put them on a baking sheet and sprinkle them with your chosen topping. (I used sesame seeds).
  14. Cook them for 20 minutes and eat!


YpuaUB on Make A Gif, Animated Gifs

Sunday 20 May 2012

A quick note about the W.I.

So on Thursday I went to my first 'proper' W.I. meeting (and was actually slightly gutted that they didn't sing Jerusalem). Anyway it was a Jubilee themed craft night, so we made fabric flowers and Jubilee cards then there were demonstrations of making bunting, tea cosies and patchwork quilts. To be honest I know how to do all the demonstrations so I didn't watch them but spend my time making a flower broach and a card. So here it is my W.I. makes... I am actually quite chuffed with them!

Tarte Tatin

Week 21, Bake 21.
As you may have read from a previous post I have been very fortunate and have met the one and only Albert Roux and when I met him he taught me how to make Tarte Tatin. I was only three and so don't actually remember him teaching me but I remember loving Tarte Tatin. So as this week I found a copy of Michel Roux's Pastry book signed by Michel I decided to make my all time favourite dessert. This is my adaption of their classic (mainly because I didn't want to make too much as its only me eating it).

Ingredients:
  • 200g of plain flour
  • 200g of very cold butter
  • 1/4 of a teaspoon of salt
  • Ice cold water
  • 4 apples
  • 75g of butter
  • 75g of caster sugar
Method:
  1. Put the plain flour on a clean surface, make a well in the centre and tip the cold cubed butter and the salt into it.
  2. Now using one hand, scrunch the butter into the flour and keep doing this until most of the butter is Incorporated yet there are still some visible flakes.
  3. Add in the ice cold water (enough to bring the pastry together).
  4. Now roll out the pastry into a long rectangle.
  5. Fold the pastry into three and give it a quarter turn. This is the first turn, now roll it out once again and fold into three. Wrap the pastry in cling film and rest for half an hour.
  6. Now do this again (turn it twice) and let it rest for another half an hour.
  7. Pre-heat the oven to 180c.
  8. Meanwhile, peel and slice the apples and cover them with lemon juice so they don't brown.
  9. Melt the butter and sugar in a pan together over a medium heat (do not stir it). This will take about 5-10 minutes until it becomes an amber colour.
  10. Now get your tartlet tins, once the caramel mixture is ready spoon it carefully (as it will be VERY hot) into the tartlet tins then carefully place the sliced apples on top into the tins.
  11. Roll out your pastry and cut it to shape, place the pastry on top of each tin squeezing it down then prick the pastry once with a fork.
  12. Cook for 15-20 minutes. The carefully take out the tarts from the tins and eat!


Wednesday 16 May 2012

Bath

I love Bath. I don't know why, probably because it is so uniform, clean and connected to its history. A little like me, I guess.

Anyway since I moved to Somerset a month ago I have had a very fleeting relationship with Bath. Popping to it to use its station or to visit a friend. But never to visit Bath. The weather has plaid its part in keeping me away, we have had a months rainfall in just one day! And the rest of the weeks weather has not been too good either. So as the sun decided to wake me up this morning (without me requesting it) I decided to utilise every minute it gave me today and head to Bath...

So after using the brilliant park and ride service I stopped in the centre of the city. I love walking around the streets of Bath, I feel so relaxed, like the feeling you get when you just come out of a spa into the warm sun.

I walked to the royal circus and then onto the royal crescent (of course stopping all the way to take pictures). Whilst I was walking I noticed some vans which look suspiciously like a film crews and so of course I double back for another look, and then once again for one more. Yes, people were filming, no I could not see what they were filming. Sadly it was being done in one of those fabulous Georgian houses. I did get very excited when I saw a man dressed in 18th century clothes, so I wondered over to where he was talking to an elderly couple under the pre-tense of me and my camera taking pictures. After they left he came over to me and I found out that he is an 18th century tour guide in Bath, such a shame. However I did find out an intresting fact about Bath... apparently the royal crescent and circus was designed and built by a pagan who loved Stonehenge. Which explains why the diameter of the circus is the same as the diameter of Stonehenge!

Anyway so from there I went to The Bath Bun Tea shoppe. As I am single I had lunch alone, usually this can be quite a scary prospect but today I grabbed a table in the tea room and enjoyed my lunch.

On from there and I walked the city a little more, stopping by the canal, where I had my first view of Bath when we came into it on a canal boat years ago. Finally I stopped to go shopping. I have had a lot of vouchers for M&S so I bought some baking equipment!

I have to say one of my favourite shops of the day was Topping Company Booksellers, where I picked up Michel Roux's Pastry book signed by him!

So a lovely day in Bath is over, and a lovely moussaka has been made in my new Le Creuset casserole dish. Now all I need to do is to think what I shall bake this week...

97wFMZ on Make A Gif, Animated Gifs

Saturday 12 May 2012

Wild garlic tear and share bread

Week 20, Bake 20.
I have been quite busy this past week, with mine and my mums birthday, work and my parents dropping off the rest of the furniture to my flat (not to mention this stinking cold I have). So I decided that Saturday afternoon would be my baking day, to relax the mind and to hopefully make me feel better after this cold. So I saw a recipe for tear and share garlic bread and then as I was driving back from the recycling centre (the long route as it is a sunny day and I was feeling adventurous) I saw some wild garlic growing. I pulled over and picked a bunch as the season is very short and decided that today's bake will be wild garlic tear and share bread.

Ingredients:
  • 315ml of lukewarm milk
  • 2 tsp of fast action yeast
  • 2 tsp of sugar
  • 3 tablespoons of olive oil
  • 1 tablespoon of vegetable oil
  • 500g of strong white bread flour
  • 2tsp of salt
  • 100g of butter
  • a small handful of wild garlic
  • A good grating of Parmesan
Method:
  1. Pour the sugar and yeast into the warm milk and whisk quickly with a fork. Now leave it to rest for 5-7 minutes, until it is frothy.
  2. Meanwhile pour the flour and salt into a large mixing bowl.
  3. Now add the oil to the yeast and pour the whole mixture into the flour and knead it together.
  4. Turn the dough out onto a floured surface and continue kneading it for 10 minutes.
  5. Put the dough into a oiled bowl and (I use an oiled shower cap instead of cling film to allow the dough to rise) put the dough in a warm place and leave it to double in size for 1 - 1 1/2 hours.
  6. Now prepare the garlic butter. Finely chop the wild garlic leaves and beat them into the softened butter.
  7. Melt the butter and garlic and leave it to cool.
  8. Now beat down the dough and divide it into small balls.
  9. Roll each ball in the butter and then pop it into a oiled cake tin in a honeycomb pattern.
  10. After one layer, grate some Parmesan over the top then create another layer with the garlic balls.
  11. Allow it to rise again in a warm place for 30 minutes or so, meanwhile pre-heat the oven to 175c.
  12. Cook for 25-30 minutes and then tear and share!


Saturday 5 May 2012

A 50th birthday cake

Week 19, Bake 19.

The first weekend in May is always busy, first it is my mums birthday and then mine! So I traveled home this weekend for a big celebration as it is my mums 50th, which means that this weeks bake is a 50th celebration cake.

Ingredients:
  • 340g of butter (salted)
  • 340g of caster sugar
  • 6 eggs
  • 1 teaspoon of vanilla essence
  • 340g of self raising flour
  • 1 1/2 tablespoons of milk
  • a small jam jar of jam (I used strawberry)
  • a lot of icing!
Method:
  1. Pre-heat the oven to 180c and line 3 sandwich cake tins with baking paper.
  2. Make sure your butter is soft and then beat it (I used a wooden spoon - and got a blister from it!), then add in the caster sugar and beat them together until light and fluffy.
  3. Now beat the eggs in a jug and add them to the cake mixture, one tablespoon at a time. Beating all the time.
  4. Once it is all incorporated and in the vanilla essence.
  5. Now sift the flour and fold it into the cake mixture.
  6. Finally gently stir in the milk.
  7. Divide equally the mixture between the three tins and then bake in the oven for 17-20 minutes.
  8. Once cooked, remove from the oven and allow to cool on a cooling rack.
  9. Once cool assemble the cake by spreading the jam in each of the different layers.
  10. To help the cake stand straight, use drinking straws to push into the base cake, cutting them off so that they are about 1cm, so you can push the other cake into it.
  11. Now layer them up and it is time to ice.


I have done a very specific theme for my mum, she loves management books (!) and so I got my dad to take a picture of her library of books and then recreated the spines of them using royal icing, food colouring and my food colouring pen. I then transported them home (via London!) and thankfully they all made it safe and sound. I then made a model of my mum reading (however forgot my food colours so had to paint it with oil paints - this is not edible, but did look good.

Anyway, after a very busy week at work and then travelling 5 hours to get home and getting up at 7am to make this cake this morning, I am shattered...