Saturday 28 January 2012

The Roux Legacy

Just a not to everyone: on 29th of jan on the good food channel at 8pm is The Roux Legacy. It will show all of the Roux family cooking together. Now, I actually have a (tiny) connection to the Roux family, when I was 3 I was taught to cook a Tarte Tatin by Albert Roux. At the time I was taking french lessons on a Saturday (I don't know why - I was crap. Probably because my mum wanted to spend some peace and quiet in the library). Anyway, so me and the rest of my french class were taught how to cook my (now) favourite dessert from one of the greatest cooks there has ever been!

So I recommend you all watch it, particularly as being taught to cook by one of the famous Roux brothers was one of my earliest memories.

Below is a picture of me being taught by the legend
Albert Roux and it is signed by him! And to the right is me, scraping out the bowl after baking a cake - times never change!


Friday 27 January 2012

A Cheer-Up Cinnamon Bun

Week 5. Bake 5.

So this week has not been the best, and things keep going down hill. So this weeks bake is cheer-up cinnamon buns (they are only 'cheer-up' buns as they taste so good and cheered me up!).

Ingredients:
  • 180ml of milk
  • 105g of soft butter
  • 450g of plain flour
  • 1 packet of dried yeast (7g)
  • 50g of white sugar
  • 3/4 tsp of salt
  • 60ml of water
  • 1 egg
  • 300g of brown sugar
  • 1 1/2 tablespoons of cinnamon
For the glaze:
  • 15g of butter
  • 120g of icing sugar
  • 1/2 teaspoon of vanilla essence
  • 2-3 tablespoons of warm water
Method:
  1. In a saucepan warm the milk and once it is warm take it off the heat and melt 60g of the butter into it. Leave it to cool.
  2. In a separate bowl mix the sifted flour, yeast, sugar and (1/2 a teaspoon of) salt together and make a well in the centre. Now add in the egg, water and the cool milk/butter mixture and bring it together to a dough. It may seem a bit dry at this point but once you turn it out onto a clean surface and start kneading it, the dough will become more moist.
  3. Now knead it for five minutes.
  4. Cover the dough with a damp cloth and leave in a warm place for 10 minutes.
  5. Meanwhile in a separate bowl mix the rest of the butter, the brown sugar, the cinnamon and the rest of the salt together in a bowl.
  6. Now roll out the dough into a rectangle 12"x9".
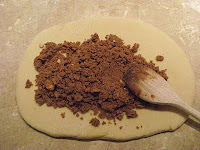
  7. Spread the sugar mixture as a thin layer over the dough, then roll the dough into a long sausage.
  8. Divide the roll of the dough into 12 separate rolls and place them into a cupcake case in a muffin tin. Now cover them in a warm place and leave them to double in size for 30 minutes. At this point pre-heat the oven to 190c.
  9. Bake for 15 minutes and then immediately take them out of the cupcake cases to cool on a wire rack.
  10. Now quickly make the glaze, by adding the soft butter, icing sugar, vanilla essence and water in a bowl and beating it. Once you get it to the consistency you want (by adding water) then drizzle over the cinnamon buns.
And that's it!

Sadly I don't think they are going to last the night...


Pin It

Saturday 21 January 2012

My Rocky Road Chocolate Brownies

Week 4. Bake 4.

I know that it is terrible to do two chocolate brownie bakes in a row, but I had an idea to create Rocky Road Chocolate Brownies. Yum.

Ingredients:

All the ingredients from my basic brownie recipe found here.

For the Rocky Road topping:
  • Small marshmallows
  • One or two rich tea biscuits
  • One hand full of raisins
  • 40-50g of chocolate chips

Method:
  1. So to make these brownies all you need to do is use last weeks recipe for the basic brownie.
  2. Now once you get to the stage where you have just spooned the mixture into your lined tin, now press in the marshmallows.
  3. Break up into chunks the rich tea biscuits and squish them into the top of the brownie.
  4. Sprinkle over the raisins and chocolate chips and cook for 18 to 20 minutes in the oven.


Pin It

Sunday 15 January 2012

Chocolate Brownies

Week 3. Bake 3.

So today's bake is one which I rarely make but absolutely LOVE. Chocolate brownies. This is a basic brownie recipe and I have already decided what I am going to add to my brownies next time, so stay tuned for Raspberry Rocky Road Chocolate Brownies...yum! So here is the basic recipe to start from.

Ingredients:
  • 200g of dark cooking chocolate (I used chocolate with 72% solids)
  • 100g of unsalted butter
  • 250g of caster sugar
  • 4 large eggs
  • 1 teaspoon of vanilla essence
  • 60g of plain flour
  • 60g of cocoa
Method:
  1. Pre-heat the oven to 180c and line a tray bake tin (approx 22 x 22cm)
  2. Melt the chocolate in a bowl over a pan of water - this allows it to melt slowly and not to burn.
  3. Once this has melted, set to one side and allow to cool (as if you add it to the brownie mixture too quickly it will melt the butter).
  4. Now beat the butter and add in the sugar and beat together until light and fluffy. This will take about 5 minutes if you are doing it by hand).
  5. Beat the eggs together and then add them to the butter/sugar mixture one tablespoon at a time, beating it all the time.
  6. Now beat in the vanilla essence and the chocolate (which should now be cool enough). Mix well.
  7. Sift the flour and cocoa twice (this will add air to the mixture) and fold it into the brownie mixture.
  8. Now pour the brownie mixture into the lined tin and place into the pre-heated oven and cook for 18-20 minutes.
  9. Once cooked (you can tell as there will be a slight wobble in the centre) leave in the tin to cool.
  10. Once cool, transfer from the tin to a cutting board and cut up the brownies into squares.


Now eat! (Store in an air tight tin for 4-5 days, but they probably wont last that long).


And just when I had finshed making my brownies I saw my cat sunggled up in one of my vintage bags... so cute.

Pin It

Monday 9 January 2012

Because it is January and we need some laughter...


Over Christmas there has been lots of Morcambe and Wise on the BBC (as there should be at Christmas) and I just love them - this is one of their best sketches, but there are so, so many other brilliant ones!


Saturday 7 January 2012

Red Velvet Cupcakes

Week 2. Bake 2.

My brother is home this week and out of all of the bakes on my list he wanted me to bake a red velvet cake, so being the good little sister I am, my bake this week is Red Velvet Cupcakes.


I have never had Red Velvet Cupcakes let alone made them. So here is the recipe for my Red Velvet Cupcakes.

(on a different matter, I have just learnt how to spell ingredients - so chuffed as I am dyslexic!).

Ingredients:
  • 2 tablespoons of red food colouring
  • 1 tablespoon of cocoa
  • 1/2 teaspoon of vanilla essence
  • 60g of salted butter (room temperature)
  • 150g of caster sugar
  • 1 egg
  • 120ml of buttermilk
  • 140g of sifted plain flour
  • 10g of sifted corn flour
  • 1/2 teaspoon of baking soda
  • 1 1/2 teaspoons of white vinegar
  • American butter cream icing
Method:
  1. In a small bowl mix the cocoa powder together with the red food colouring. Add the vanilla essence.
  2. In a separate bowl beat the room temperature butter together with the sugar until light and fluffy. This took me about 5-6 minutes as I don't have a Kitchenaid mixer sadly, so I beat all my cakes by hand until I can afford one.
  3. Now beat the egg in a cup, and slowly add it to the butter/sugar mixture one tablespoon at a time, beating constantly.
  4. Now add the cocoa mixture to the big bowl and beat it for a minute or so.
  5. Pour in half of the buttermilk and beat it into the mixture, then add half of the flour (add the plain flour and the corn flour together to do this).
  6. Now beat the mixture, add the rest of the buttermilk, beat it in and then add the final amount of flour.
  7. At this point add the final ingredients, the vinegar and the baking soda into the cupcake mixture and mix for a minute or two.
  8. Now put the cupcakes into cases and bake at 170c for 20 minutes.
  9. Once they come out of the oven, leave them for a minute in the tin and then transfer the cupcakes to a cooling rack.
  10. The finish off the cupcakes with either cream cheese frosting or butter cream icing (like I did).

I don't think that I will make these cupcakes again, for one reason, I don't like the fact that they are basically chocolate cupcakes and yet they are red. Chocolate cupcakes should be chocolate coloured. Another reason why I don't think I will make them again is that they are not my regular cupcake recipe and as a result I don't think they are as light and fluffy. (Check back for my cupcake recipe). So as recipes go, its not the best, but it tastes good!


Pin It

Sunday 1 January 2012

On your marks, get set, bake!


52 weeks. 52 bakes.
Week 1. Bake 1.

Today was my first. Victoria Sponge.

To be honest I used the recipe from The Great British Bake Off cookbook. So I probably shouldn't put the recipe up on my blog, and I wont. But here is what I have learned today whilst making it.

  1. To make the best cake use butter which has been out of the fridge for about 1 hour.
  2. Beat the sugar and butter together for 4-5 minutes which will make it much lighter.
  3. Measure the cake tin lining carefully or you will get crinkly edges to your cake.